
Introduction
What is so interesting about Norway?
That was the question I asked myself when a friend invited me on a photography trip to Norway. At the time, the country was completely off my radar.
At first glance, Norway looked beautiful, but nothing extraordinary. Having lived in the United Kingdom for almost ten years, I had grown accustomed to this type of scenery. Norway felt familiar rather than exciting, so I didn’t think it was worth traveling halfway across the world
That was before I saw Norway through the eyes of other photographers.
Among those photographs, one thing immediately caught my attention, the Northern Lights (Aurora Borealis). I had only seen those glowing green skies in photographs and wanted to experience them with my own eyes.
That alone was enough to convince me to make the trip.
Looking back, it was one of the best decisions I’ve ever made. The Northern Lights were unforgettable, but what truly changed my perspective were the landscapes. They expanded my horizons and made Norway one of the most memorable photography trips I’ve ever taken.
In this post, I’ll share some of Norway’s best landscape photography locations. Along the way, I’ll explain how I approached each composition and the editing decisions behind the final images.
Traveling in Norway
Renting a car is almost essential for exploring Norway. Many photography locations are difficult to reach using public transport. If you’re visiting from overseas, you’ll also need an International Driving Permit before your trip.
Norway has strict traffic laws, so it’s important to follow the rules at all times. Aside from that, driving is straightforward and the roads are well maintained.
Norwegian is the country’s primary language, but English is widely spoken. As long as you’re comfortable communicating in English, you shouldn’t have any problems getting around.
Camera Gear
For this trip, I used the following set up
- Camera – Sony A7CII
- Camera Lens
- FE-PZ 16-35mm F4 G
- FE 28-70mm F2 GM
- FE 70-200mm Macro F4 G OSS II
- Camera Tripods
- K&F Concept K254A3 – Any tripods with good height extension and wind resistance should do the job as well.
- ND/CPL Filters – A variable ND filter (ND 2-32) should be enough. If you have one, bring ND 1000 can be useful in very bright conditions.
- K&F Concept NANO-X ND 2-32
- K&F Concept NANO series MCUV & CPL & ND1000
- K&F CONCEPT SNJ51T/SN25T1 Square Filter Set
- Rotatable Mount Plate Kit –
- Ulanzi S63 Claw Rotatable Horizontal to Vertical Mount Plate Kit. They are very useful for different purposes. We will discussed this later on.
Kabelvåg: The Fishing Village within Lofoten Island

FE PZ 16-35 F4 G
f16 ss 0.8s ISO 100
Kabelvåg is one of Lofoten’s most underrated photography locations. While places like Hamnøy and Reine attract most visitors, Kabelvåg remains much quieter, making it ideal for photographers looking for a more peaceful experience.
With a history spanning more than 1,000 years, Kabelvåg is one of Northern Norway’s oldest fishing villages. For centuries, migrating cod brought thousands of seasonal fishermen here each winter. To support them, King Øystein Magnusson established a church and a fishermen’s hostel, helping the village grow into an important fishing community.
Today, Kabelvåg remain as a quiet village rather than a busy tourist destination. Vintage cabins, calm water and surrounding mountains create a peaceful landscape.
One place worth visiting is Nyvågar Rorbuhotell in Kabelvåg. The traditional rorbu (fisherman cabins) preserve the character of old fishing villages while providing modern comfort for visitors. Moreover, the main photography location is only a short walk behind the hotel.
Photography Tips
Reaching the viewpoint requires a short 10-minute walk uphill. The path isn’t particularly steep, making it accessible to most visitors.
Photograph this scene after sunrise, when the warm morning light begins to illuminate the landscape. The sunlight enhances the green hills and red cabins, creating a peaceful atmosphere.
Use a wide-angle lens to capture the row of red cabins together with the surrounding landscape. Leave enough space around the cabins so the composition doesn’t feel cramped. A slight tilted is needed.
Take long exposure shots to smoothen the water surface, adding to the calm atmosphere. Include both the surrounding hills and distant mountains to give the image depth and reinforce the quiet character of the village.
For the image above, it’s worth waiting for the darker clouds to pass. A few clouds can add character and reflect Kabelvåg’s fishing heritage, but too many make the scene feel heavy and distract from its peaceful atmosphere.
From the main viewpoint, take some time to explore the surrounding area. While these scenes may not be as iconic, they capture the calm and peaceful atmosphere of Kabelvåg just as well. One example is shown below.

FE 70-200 F4 G OSS
f13 ss 0.4s ISO 100
Overall, when photographing Kabelvåg, try to include the surrounding greenery and photograph the scene under soft, warm sunlight. Together, they capture the peaceful character of the village.
Photo Editing Tips
Adjust the overall brightness until the image feels bright while retaining detail in both the highlights and shadows. Reduce the clarity slightly to soften the scene and enhance its peaceful atmosphere.
For the colors, slightly reduce the saturation of the surrounding greens and yellows to create a more natural look. At the same time, increase the saturation of the red rorbu cabins so they become the visual focal point.
Darken the areas surrounding the rorbu cabins to draw the viewer’s eye toward them. Add a subtle shade of light to the cabins to further enhance it without making the effect obvious.
Since the scene was photographed under dark clouds, reduce the brightness of the sky slightly to preserve its natural appearance and prevent it from becoming distracting.
Vågan Church – Lofoten Cathedral

FE PZ 16-35 F4 G
f4 ss1/100 ISO 100
Vågan Church is one of Lofoten’s most recognizable landmarks. It was built in the late 1800s to support seasonal fishermen. Today, it remains an active church that welcomes both locals and visitors during the summer.
Every winter, thousands of fishermen travelled to Lofoten to catch migrating Atlantic cod. Although winter offered the best fishing season, it also brought rough seas, strong winds, and unpredictable weather.
Religion played an important role in the lives of many fishermen. Before heading out to sea, they often gathered at church to pray for a safe journey.
At the time, the existing church could no longer accommodate the growing number of local residents and seasonal fishermen. As a result, Vågan Church was built to serve both communities.
Photographically, the church is well known for its distinctive architecture. The surrounding grass, rocks and water complement the church, creating a simple yet visually appealing composition.
Photography Tips
The photography location is directly beside the church. There is a parking lot with plenty of parking spaces nearby.
Make your way down the slope till you see water flowing towards the church. Position the camera close to ground level so the rocks, seaweed, and shallow stream dominate the foreground. These elements add depth and naturally draw the viewer towards the church and the surrounding mountains.
Use the surrounding grass, rocks, and water as foreground elements. They add depth to the composition while naturally guiding the viewer’s attention towards the church.
Although golden hour is the traditional choice, don’t overlook rainy weather. Dark clouds and grey rocks create a more dramatic atmosphere that reflects the hardships faced by the fishermen who once worshipped here. After learning the church’s history, the image becomes even more meaningful.
Photo Editing Tips
The goal of editing this photo is to create a balanced image rather than making the church stand out.
Brighten the image and reduce the highlights to recover lost details. Slightly increase the clarity and texture to enhance the details while emphasizing Lofoten’s harsh weather conditions.
Darken the surrounding sky and foreground slightly so they don’t draw too much attention while making it blend with Lofoten’s weather.
For the colours, give the image a slightly cooler tone to enhance the atmosphere around the church. Be careful not to shift the church’s colours too much, as they should remain natural. Increase the saturation slightly to reinforce the blue tones without overpowering the scene.
Hamnøy – The Charming Fishing Village in Lofoten

FE PZ 16-35 F4 G
f10 ss 0.6s ISO 100
When people think of Lofoten, Hamnøy is often one of the first places that comes to mind. Not because of its history, but because of its iconic landscape.
Like many villages in Lofoten, Hamnøy grew around the cod fishing industry. Fishermen lived in the red rorbu cabins and landed their daily catch here.
Over time, the Eilassen family helped shape Hamnøy by organising local fishing operations. They bought fish from fishermen, processed them into stockfish, and exported them overseas.
Today, Hamnøy remains one the best preserved traditional fishing village in Lofoten that communicates the everyday life of fishermen.
Photographically, Hamnøy is best known for its cluster of red rorbu cabins set against Festhelltinden in the background. Together, they create one of the most memorable landscapes in Lofoten.
Photography Tips
The viewpoint is located on the bridge leading into Hamnøy. From here, you can see the cluster of red rorbu cabins with Festhelltinden rising behind them. A parking lot is available nearby.
Position the red rorbu cabins in the lower-right corner of the frame, with Festhelltinden as background in the centre. Use a wide-angle lens to capture the surrounding landscape without making the composition feel cramped.
Long exposure shots are an option to emphasize cloud movement while smoothing the water surface. Together, these elements highlight the harsh environmental conditions in Lofoten while preserving the image of a peaceful fishing village. However, a single shot also works by preserving the natural texture of the water and clouds.
Another option is to shoot this scene vertically. This tightens the composition by placing greater emphasis on the cabins and mountain, while sacrificing some of the surrounding environment and storytelling elements. An example is shown below.

FE PZ 16-35 F4 G
f13 ss 0.5s ISO 100
Photo Editing Tips
The aim of editing this shot is to emphasize the harsh conditions of Lofoten while preserving the peaceful character of the fishing village.
Balance the brightness so the scene is bright enough while retaining the details. Recover details in the mountains and surrounding rocks by increasing the contrast and texture.
Darken the surrounding clouds and water to emphasize Lofoten’s harsh weather while retaining enough detail to keep the scene natural.
Apply a cool tone to the image to make the harsh conditions more impactful. Increase the saturation of the cabins so they stand out, but adjust it carefully to maintain a natural appearance.
Okshornan – The Godzilla’s Back in Tungeneset, Senja

FE PZ 16-35mm f4 G
f13 ss 4s ISO 100
Unlike the previous locations, Tungeneset is better known for its natural landscape than its history. Today, it is considered one of Norway’s iconic landmarks.
The main attraction is Okshornan, the mountain range that dominates the landscape. Its series of narrow, jagged peaks differentiates itself from other mountains.
The name Okshornan means “The Ox’s Horns,” referring to its sharp peaks. Among many Asian photographers, it is also nicknamed “Godzilla’s Back,” while Europeans refer to it as “The Devil’s Teeth.”
Photography Tips
The shooting point is located at Tungeneset, where parking is available. Walk towards the shoreline for an unobstructed view of Okshornan.
Use a wide-angle lens to capture the entire mountain range. Use the rocky shoreline as a foreground element to add depth to the composition while naturally guiding the viewer’s attention towards Okshornan. Frame the mountain near the centre of the image.
Long exposure is a good option for smoothing the water’s surface. Ideally, photograph the scene when the waves are surging to strengthen the storytelling element of the image. Alternatively, a calm water surface creates a peaceful contrast to Okshornan’s jagged peaks.
In the example above, sunlight illuminates part of Okshornan while dark clouds remain overhead. The contrast between light and shadow makes the scene more dramatic.
Photo Editing Tips
The goal of editing this photo is to emphasize the contrast between light and shadow while maintaining the visibility of its surroundings.
Adjust the brightness so that all the details remain visible. Enhance the details by increasing the texture while reducing the clarity slightly to soften the image.
Darken the rocky shoreline so that attention is focused on Okshornan. Manage this carefully so that all the elements of the image blend naturally together.
As this photo was taken during the day, apply a slightly warmer tone to reflect the natural daylight. Adjust it carefully so the image still feels realistic.
Finally, increase the contrast to give the illuminated areas of Okshornan greater impact. This strengthens the contrast between light and shadow, making the image feel more dramatic.
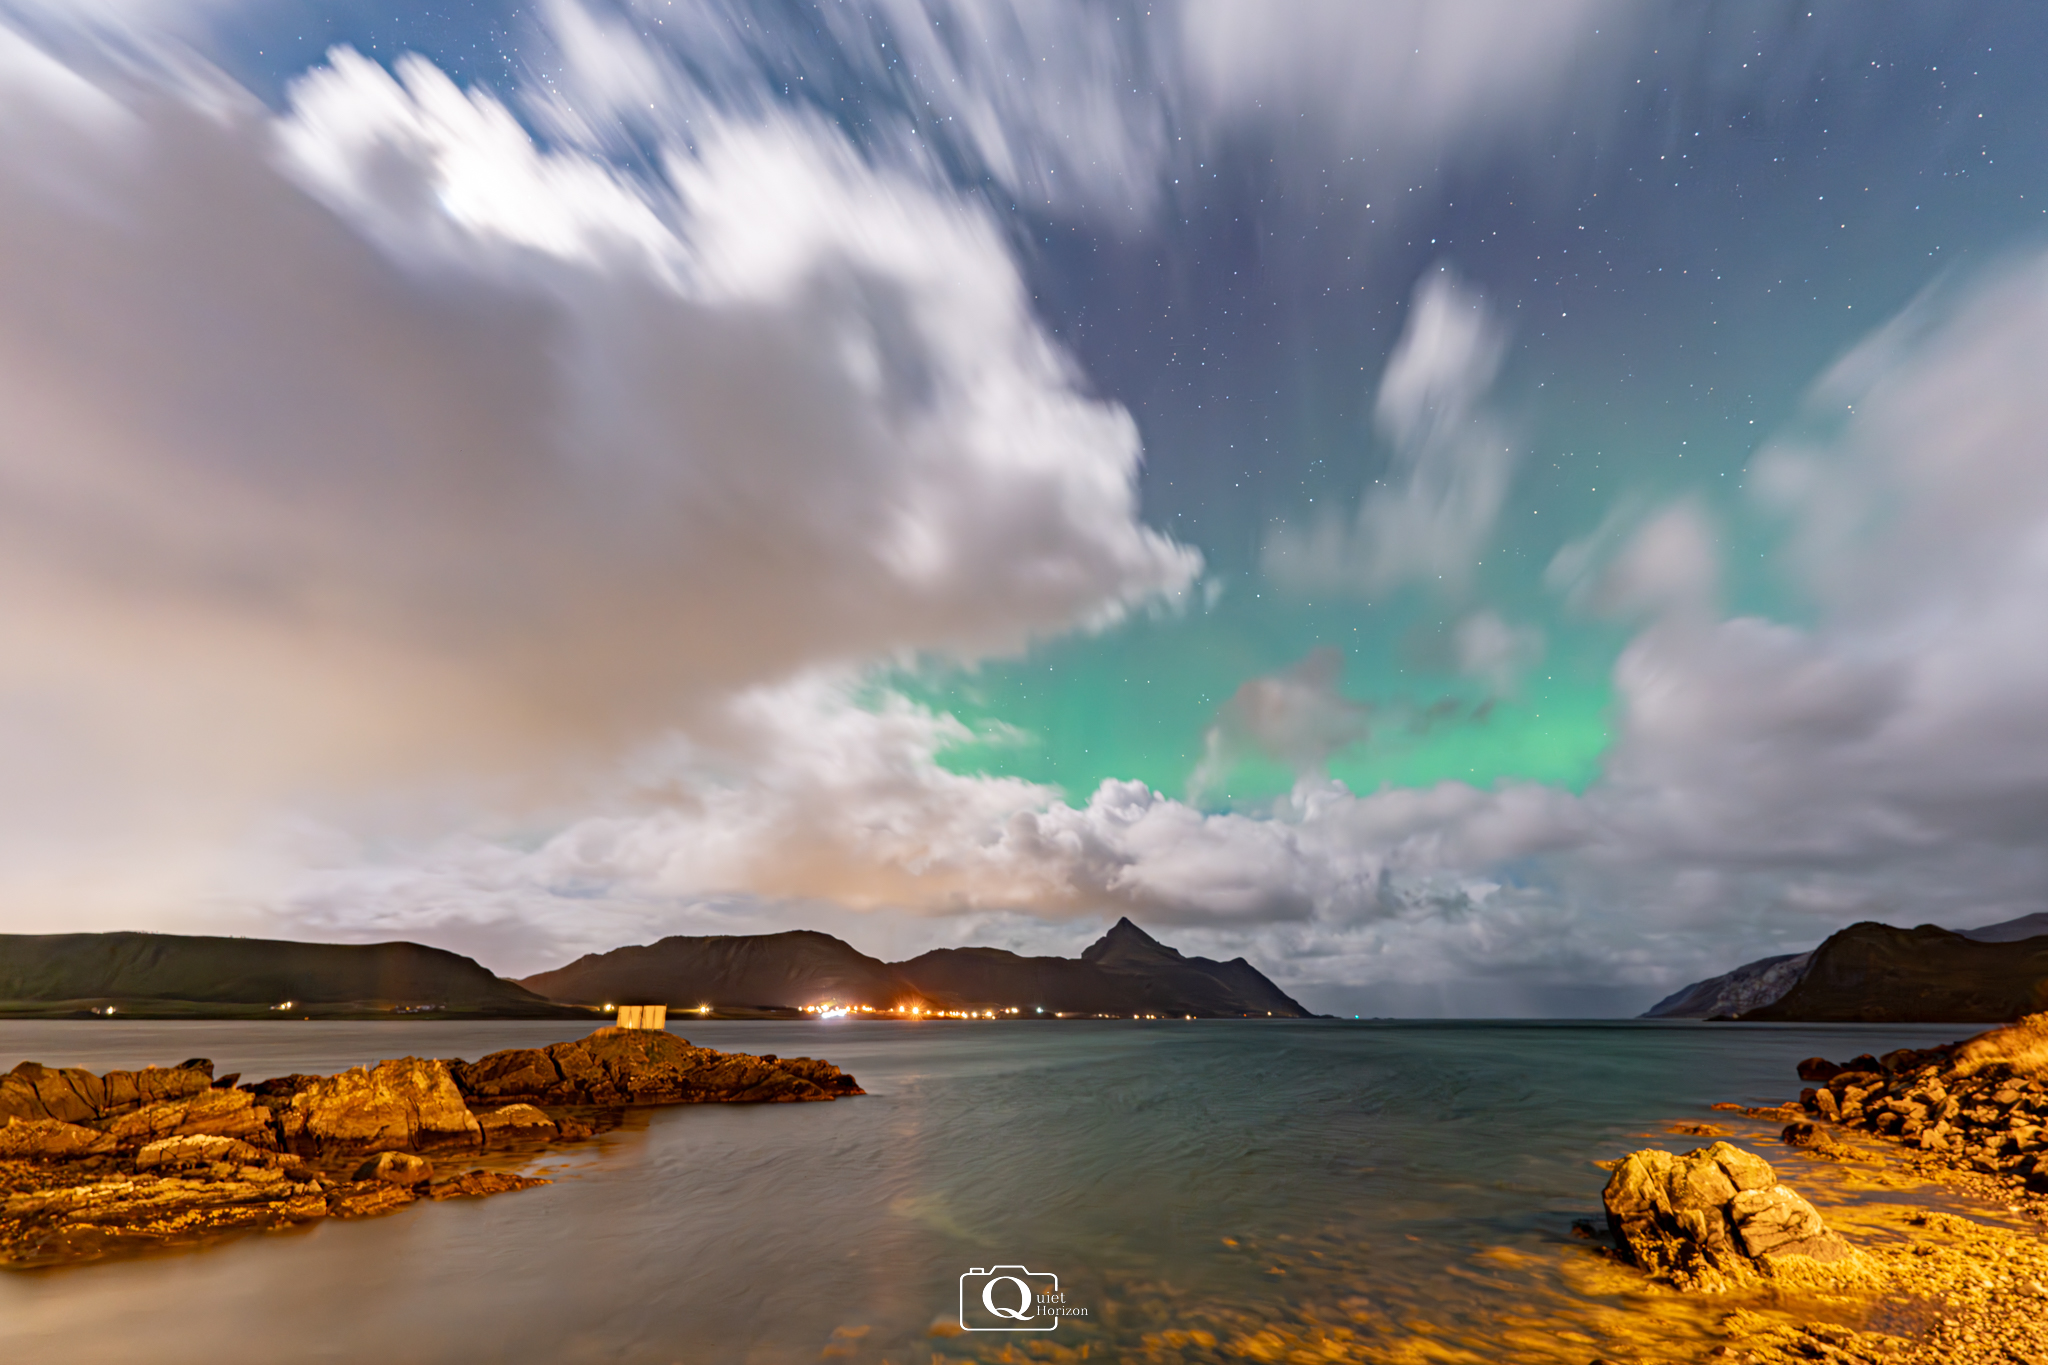
Northern Lights

FE PZ 16-35mm f4 G
f4 ss 10s ISO 1250
Norway is one of the best places to see the Aurora Borealis (Northern Lights). This is because the country lies beneath the Aurora Oval, where auroras occur most frequently.
The Northern Lights are created when charged particles from the Sun collide with gases in Earth’s atmosphere. They are most visible on clear, dark nights.
The Northern Lights were the reason I travelled to Norway. Ironically, the most memorable part wasn’t seeing them with my own eyes. It was watching them slowly appear on the back of my camera after each exposure.
Photography Tips
When photographing the Northern Lights, there are no fixed locations or exact times. The goal is to find a place where the aurora is most visible and compose the strongest possible image.
Because of constantly changing cloud conditions, the Northern Lights may only be visible for short periods of time. Being alert at all times is therefore crucial. In a way, it is like photographing sunrise or sunset, but far more unpredictable.
Northern lights can be seen with a naked eye. But they appear much more fainter than they do in photograph. Keeping a close watch is therefore important.
Take long exposure shots. Somewhere around 6 to 10 seconds should be ideal. The key here is to find the right balance between visibility and its movement. If the shutter speed is too fast, the image may be too dark to capture the aurora. If it is too slow, the aurora may lose its shape and movement.
When taking photos with a shutter speed of 6 to 10 seconds during night time, it will almost certainly be too dark. For that, the aperture should be as wide as possible.
The ISO value should also be high enough so that northern lights can be captured cleanly. Although this introduces noise, it is usually less noticeable in night photography.
Even with these camera settings, the final image may not look right until after it has been taken. The composition may be slightly off, or the photo may be overexposed. Experimenting and taking multiple shots is therefore essential.
Some examples are shown below

FE PZ 16-35mm f4 G
f4 ss 10s ISO 8000
In example 8, the aurora is the main subject. Its shape naturally separates it from the surroundings, while the rest of the scene simply supports it.

FE PZ 16-35mm f4 G
f4 ss 6s ISO 3200
This image takes a different approach. Okshornan becomes the main subject while the aurora supports the composition. The water acts as a foreground element, leading the viewer towards Godzilla’s Back, while the aurora adds drama to the scene.
Photo Editing Tips
Editing Northern Lights photographs depends on the composition of each image. However, there are several adjustments that apply to almost every photo.
Since these photos are taken in the dark, often without artificial light for reference, the horizon can easily become tilted. Straighten the image before making any other adjustments.
Increase the saturation of the Northern Lights, as they are usually the main element that makes the image so interesting.
Denoising is essential. Since Northern Lights photographs are taken at high ISO values, reducing noise produces a much cleaner image.
When the aurora is the main subject, not every part of the landscape needs to be fully visible. Allowing some areas to remain dark naturally draws attention to the Northern Lights. Examples 8 and 9 demonstrate this approach.
When the Northern Lights become a supporting element instead, recovering more detail from the landscape becomes important. Example 7 demonstrates this approach.
Conclusion
At first, visiting Norway didn’t sound particularly interesting to me. Looking back, I’m grateful that I decided to make the journey.
Photographing the Aurora Borealis was an unforgettable experience and helped me grow as a landscape photographer. Yet it wasn’t just the Northern Lights that made the trip memorable. It was Norway as a whole.
As I wrote this article, I began to understand the significance of each place I visited. Looking back at my photographs, I feel even more satisfied with them than before.
More importantly, I came to understand one thing.
While beautiful lighting certainly enhances a photograph, understanding the place itself and capturing it under conditions that feel true to its character makes the image far more meaningful.
That realization broadened my perspective. Not only as a photographer, but also as a traveller.
Disclosures
AI tools were used to assist with outlining, clarification, and editing suggestions.
All ideas, interpretations, and final writing decisions are my own.
References
Wikipedia contributors. (2025, November 29). Kabelvåg. In Wikipedia. https://en.wikipedia.org/wiki/Kabelv%C3%A5g
Destination Lofoten. (n.d.). The Lofoten Cathedral in Kabelvåg – Vågan Church. Visit Lofoten. https://visitlofoten.com/en/lofotkatedralen/
NordNorsk Reiseliv AS. (2019, December 19). The Lofoten Cathedral. Arctic Norway. https://nordnorge.com/en/aktivitet/the-lofoten-cathedral/
Jesper. (2025, September 14). Hamnøy, Lofoten | Exploring Norway. Biveros Bulletin. https://biveros.com/hamnoy-norway/
Melissa. (2025, June 27). Hamnøy: Most photogenic fishing village in the Lofoten, Norway. Travel in My Pocket. https://www.travelinmypocket.com/hamnoy-lofoten-norway
Kombrink, H. (2022). Ancient rocks, trolls and the Devil’s Teeth: Adventures in scenic Senja. GEO ExPro. https://geoexpro.com/ancient-rocks-trolls-and-the-devils-teeth-adventures-in-scenic-senja/
Architectuul. (2012, October 19). Viewpoint Tungeneset. https://architectuul.com/architecture/viewpoint-tungeneset
Leave a Reply